Introduction
Interface
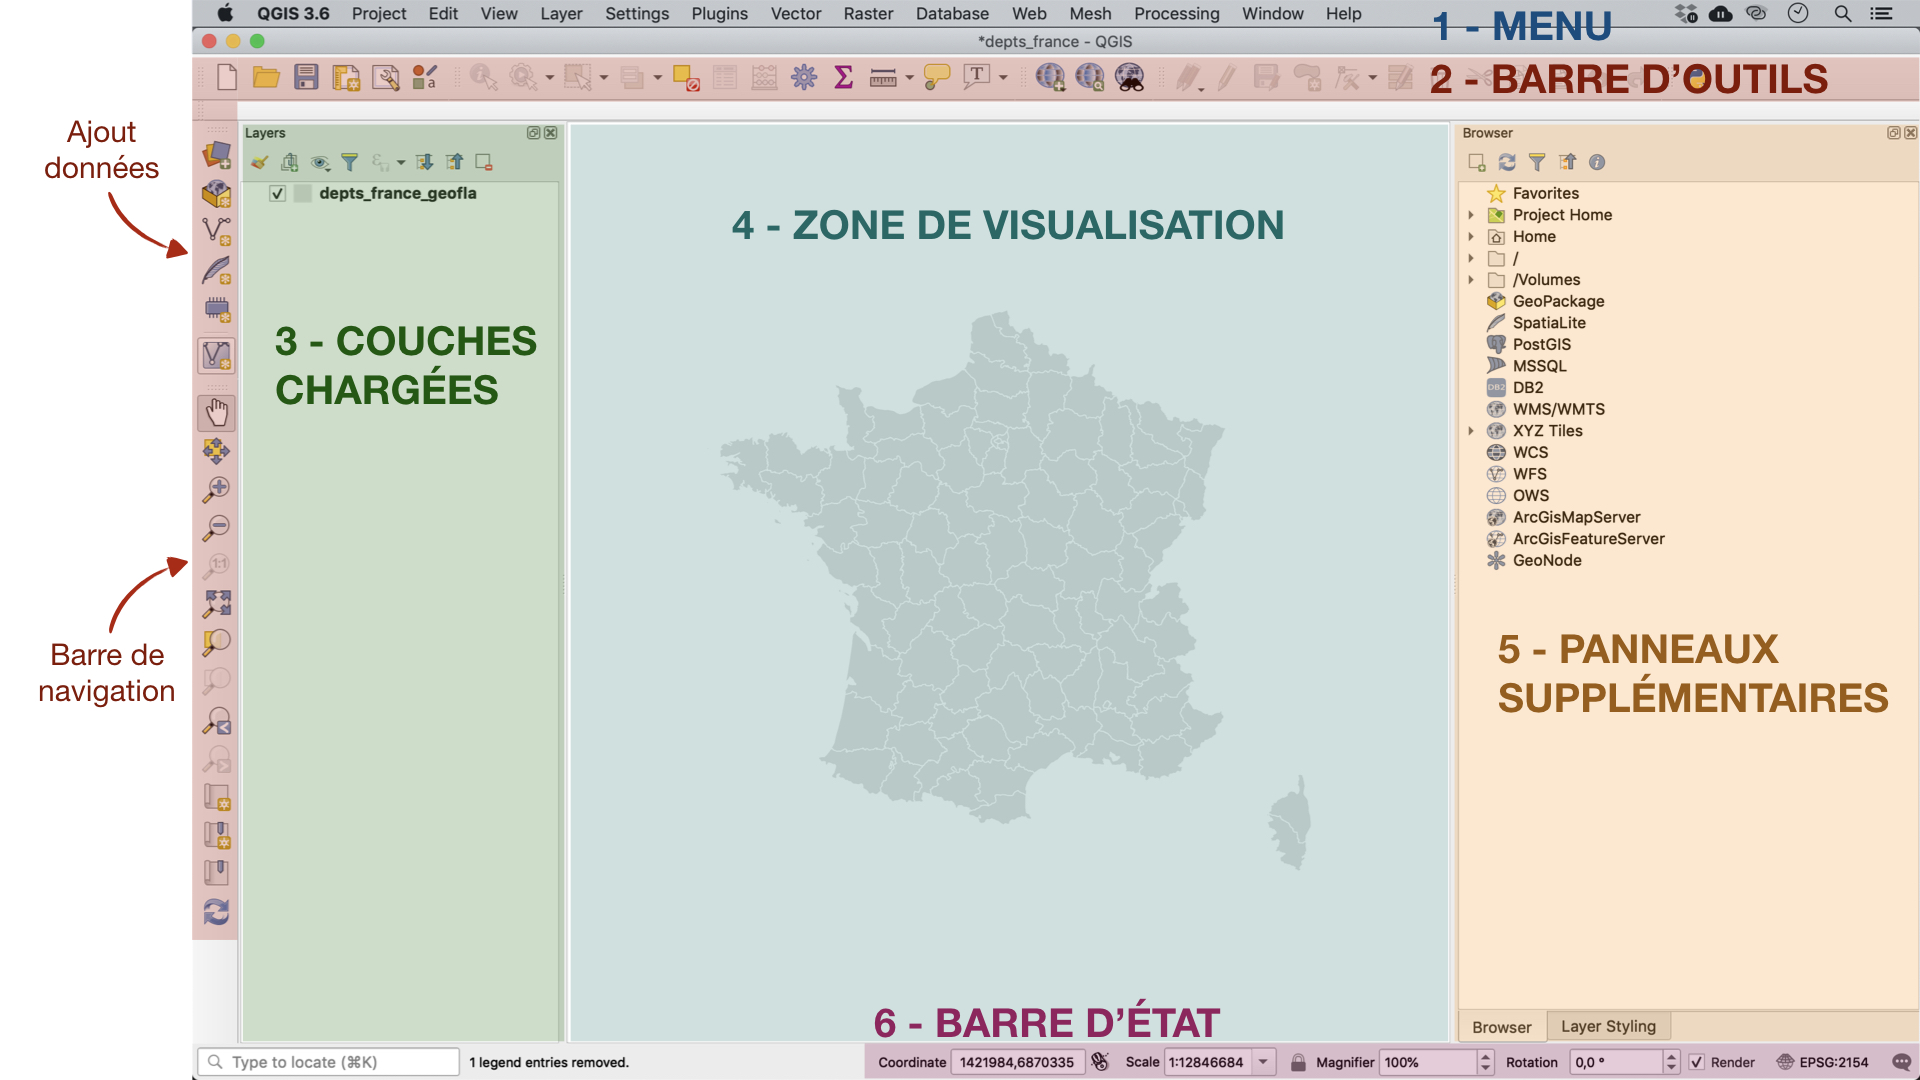
There are 6 zones in QGIS.
1. Menu bar. Here you will find the navigation, geoprocessing, visualization and representation tools. This is also where you'll find the plugins.
2. Toolbars. Here you will find the same things as in the menus, but in the form of icons. To find out what a tool does, hover your mouse over it and read the tooltip. To add or remove toolbars, right-click anywhere in this area except on a deactivated tool, and tick or untick the toolbars you want.
3. List of loaded layers. Also known as the table of contents. If there are several layers, you can change the order in which they are displayed here. The order of the layers in this panel is important. Layers at the top will be displayed above layers at the bottom. Layers should therefore be ordered with background maps at the bottom of the list and point layers at the top. To make this area appear or disappear:
menu View → Panels → Layers4. View area. You can zoom in and out of this area using the mouse wheel and trackpad. You can also move around the map by holding down the space key, whatever tool you are using in QGIS. The same result is obtained by holding down the mouse wheel (extended wheel click).
5. Additional panels. For example the Explorer panel.
To add panels,Menu View → Panels6. Status bar. This shows the coordinates of the point where the mouse is located, the scale, etc.
Data management
Workspace
A project is a workspace. Saving a project is equivalent to saving the style used for each layer, the zoom, the geographic reference frame... but not the data! It is of course not useful to understand the contents of the project file in detail, but it is important to note that it is only a text file, which will 'call' the data. If you provide a colleague with only your QGS file, without the corresponding data, that colleague will not be able to view the data. A QGIS project is saved with the
.qgsextension.It is good practice to set up a workspace to ensure that the data you export is saved directly to the correct path where your data is stored. Go to
Project > Properties > General > General Settings > Project home > Define pathand select the folder in which you save your data.Vector layer format
Different vector layer formats exist.
The Shapefile format (
.shp) created by ESRI for ArcGIS software, is one of the GIS standards and is the most widely used today. In reality, a Shapefile is made up of at least three files, with an additional and very useful fourth :.shpwhich contains spatial information;.dbfwhich contains attribute information (limitations for column names: no accents and maximum 10 characters) ;.shxwhich is an index file ;.prjwhich contains the code for the coordinate system and, where applicable, the projection.
For the shapefile to open correctly, all these files must have exactly the same name (only the extension changes).
Raster layer format
There are many different formats for rasters. Many common image formats have equivalents for GIS software.
For example, the
.tiffiles used in GIS software have additional information compared with "classic".tiffiles: what type of coordinates are used, what are the image coordinates, etc. This is a special case of.tifcalled GeoTIFF. The file extension remains.tif. However, when loaded into GIS software, this.tifwill be displayed directly in the right place.Other files can be associated with a raster:
.qml: this optional file saves the representation mode of the raster: black to white, minimum and maximum value. If it is not present, the raster will be displayed with default settings. It is specific to QGIS..aux.xml: this file, which is sometimes present, saves statistics and sometimes the image coordinate system. It is used to speed up display and certain processing operations. This file can also be read by ArcGIS software..tfw: often called a "World file", this file stores the image coordinates and pixel size. This type of file exists for several image formats: the extension will be.jgwfor a.jpg,.pgwfor a.png, etc. This file is not necessary if the information is already contained in the image header (which is the case for our GeoTIFF). World files are used less and less in GIS; however, they can be useful for non-GIS software or for image formats that do not allow location information to be stored in the header.